We do not buy or sell cryptocurrency. You can do this at Invexcoin.com
INVEX INSTRUCTIONS
HOW TO ONBOARD INVEXCOIN.COM
1: Go to INVEXCOIN.COM from a computer – Not a phone or tablet.
2: Select “Register” and select “SIGN-UP” on the Right
3: Fill out an email (You HAVE TO use the same email that you used for vistanetwork.com) then create a new password.
4: Now go to INVEXCOIN.COM and click on “Login”
A window will pop up telling you that it sent you an email, and you need to verify it.
5: Go to your e-mail box and look for an email from “hi” email [email protected] and click on “Confirm” in Red. Look in your spam folder if you can’t find it.
6(a): Now login into INVEXCOIN.COM.
6(b): You have to know how to log out from your Invexcoin account. You always log out from your wallet. You click on “Profile”
Then click on “Details” Then Log Out
To log out from “Trade” only, in Trading page you will see on the left side a tab with 3 horizontals lines. Click on it. Then click on “Log out” This only logs you out from “Trading”. Your wallet account is still open. If you have trouble logging in, next time you want to log in to your account and can't, then you will have to clean your history.
OK Let's continue with the sign up!
You should be asked to authenticate yourself with a QR code.
7: If not already on your cell phone, download the app: “Google Authenticator” from your app store to your phone. The icon of the app looks like this:

Go to your authenticator app, open it and click on the "+" sign on the bottom right.
Then click on "Scan a QR Code"
When done, put your cell phone in front of the QR code on your computer screen, then enter the code from your cell phone google authenticator app. The numbers are changing every 15-20 seconds. Wait until the blue circle is full so you have enough time to see the numbers and insert them in your authenticator on your computer.
8: After putting the numbers, you will be directed to your Invexcoin wallet.
9: It will tell you to go to your profile.
So, go to your profile on the top right and click on it. You will see email verification “verified”.
10: You will see “Phone Verification”. Those who live outside the USA and Canada, have to send an email to [email protected] including your email address and the Tel # that has to be verified.Check in your account, within 24 hours, if it was verified. It will be in green.
Those residing in the USA or Canada:
Click on “Verify” and follow the prompts:
Put your cell # in the box saying “telephone #”, then click “Receive the code" then go to your text messages on your cell and retrieve the code from a message arriving from Exchange.Invexcoin.com. Insert the code in the appropriate box saying “Code”. The telephone verification will show “verified”
Like that:

11: Next step is “Identity Verification”. Click on “Verify” and follow the prompts.
You will have to download a photo of your ID or passport, to your computer – take a photo of it and email it to yourself – then download the photo to your computer. Then when asked, upload the photo to Invexcoin. For USA ID card, only the front side is needed.
When all is done, it will show “Pending”
Like that:

Now you have to wait 1-3 days to be verified.
12: (You won’t be able to go through the rest if you’re not verified)
When verified Login. Then insert the 6 numbers from Google Authenticator. Every time you log in, you will have to insert the 6 numbers, which are different each time.
You will be in your "wallet"
13: Scroll down on the left and select “Vista”
Now scroll up and select “Deposit”.
A QR code with a “Deposit Wallet Address” link will show up on your screen.
14: Click on “Copy” to copy the address link.
15: Now open your back office on Vista Coin.com website, insert your user ID & Password.
16: When on your Dashboard, hover on the “E-Wallet”
17: You’ll see this:
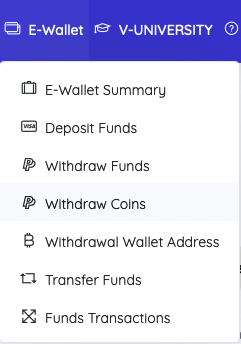
18: Click on the “Withdraw Coins” from dropdown.
A window like this pops up:
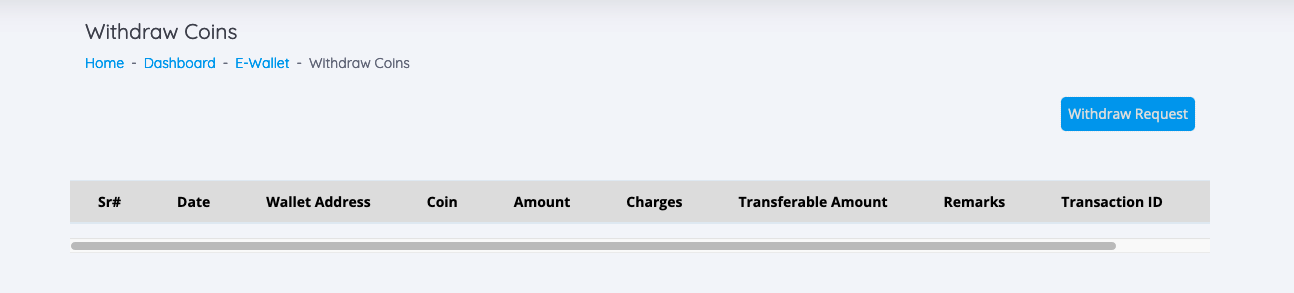
Click on "Withdraw" on the top right.
It will open the “Withdraw Coin Request”
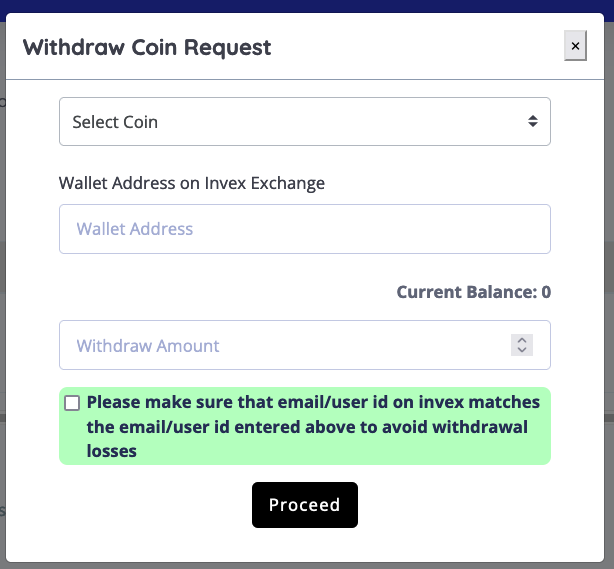
Paste the address link that you copied before, in the box “Vista Coin Address Wallet on INVEX EXCHANGE”
(Above the box “Withdraw Amount” on the right you will be able to see the total Vista Coins you own.)
Then put the desired Vista Coins withdrawal amount.
19: When done check the green box “Please make sure…” This is important to check the data is correct.
20: Click “Proceed”.
21: When you do, you’ll see a little window appears like that:
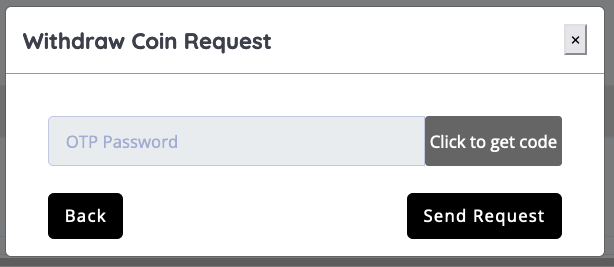
Click on “Click to get code" on the right – that will send a code to your e-mail (the one registered in Vista Coin and Invexcoin).
Enter the code when you have it.
22: Click “Send Request” on the right.
23: Now on this screen in your vistanetwork.com website, you will see pending.
Then when done you’ll see “approved” like this:

24: Now you’ll just have to wait for a little so that the coins get transferred from your Back-office in Vista Network, into your wallet in INVEXCOIN.
25: The Vista Coins will arrive in your Trading wallet. You want to move them to your Primary wallet. This gives you more layers of security.
Go to your Invexcoin wallet, and scroll down on the left to "Vista". Click on it. Then scroll up to "Move" and click on it.
A window will pop up. Make sure you transfer from the trading wallet to the primary wallet. There is a circle on the right with up and down arrows. Click on it to say from trading wallet to Primary wallet. Insert the amount of Vista Coins to be transferred and click "Confirm"
And voilà!!
Your Coins are now securely moved!
For trading purposes, you have to have USDT (Tether) for “gas” money as a transfer fee.
You can also buy more Vista Coins with USDT.